How to Make Compost - Galvanized Wire Cage Style
Learning how to make compost will make you a better gardener or farmer
Compost is soil's version of a probiotic rich, nutrient dense cake. Sweet, tasty, and crawling with life (if built correctly), compost is a fast way to deliver food to your plants.

Compost reaching the 'dark chocolate' stage. Yum.
There are many ways to make compost.
Choosing the style of compost creation will depend on your site, your availability, resources/compost ingredients, and intended end use. This method of how to make compost utilizes the hot/thermal method and a galvanized wire cage to help maintain shape. We learned of this method at Dr. Elaine Ingham's Soil Foodweb master class. We highly recommend taking one of her seminars to learn much more about the intricacies of the soil food web and how we fit into it. Other methods of compost creation are the cold composting/worm composting (vermicomposting) or static composting.
How to Make Compost - Hot/Thermal Method using Galvanized Wire Cage

This method of compost making is one of the fastest, but does require a lot of physical labor and daily attention, especially during the first half of the process.
Site Selection
- Flat, level ground with a minimum space of 12' x 12' is needed for turning one cubic yard of compost. More room and space is always ideal as your pitch fork or turning implement will need clearance from fences or other structures.
- Access to water is also crucial to ensure optimal moisture content in the pile.
- Depending on your location on earth and time of year, sun exposure will be important. Too little heat in the pile will reduce the ability to kill pathogens or unwanted seeds, too hot and anaerobic conditions will be created and biodiversity will plummet. Excess wind exposure will also rapidly dry out a pile.

Includes a variety of beneficial bacteria for increasing biological diversity of microbes.
Materials
- High nitrogen food or "party food" as Dr. Ingham likes to say with a Carbon to Nitrogen (C:N) ratio of 10:1
- Fresh manures
- Fresh leguminous plants, but only if rhizome nodules are pink/red
- Seeds or nuts
- Meat (yes, you can use meat in a thermal compost, just be aware that it can attract unwanted visitors and use your better judgement if you're making in close proximity to neighbors)
- Green plant cuttings - food for the bacteria - C:N of 30:1
- Woody materials with cellulose and lignin - food for fungal growth - C:N of 60:1
- Straw
- Shredded wood chips
- Inoculant - sourced from healthy ecosystems (or cured compost) for desired end use (e.g. oak woodland, veggie garden, etc.), can also use a compost starter like Dr. Earth
- Water

Composting tools of the trade. A stiffer manure fork is recommended, though, for turning.
Tools
- Compost temperature probe - Minimum 24" long
- Roll of 2" x 1" galvanized cage wire - 36" h x 25' l (you can make two 36" x 4' dia. compost cages with this roll)
- Wire cutters
- Tarp - 10' x 12'
- Humic acid - make your own by leaching water through 1 lb. of fresh worm castings
- Fertilizer hose end sprayer
- Garden hose and water supply
- Shovel, rake, sturdy pitchfork
- Pencil and Paper
- 5-gallon bucket
Instructions - Building the Compost Pile

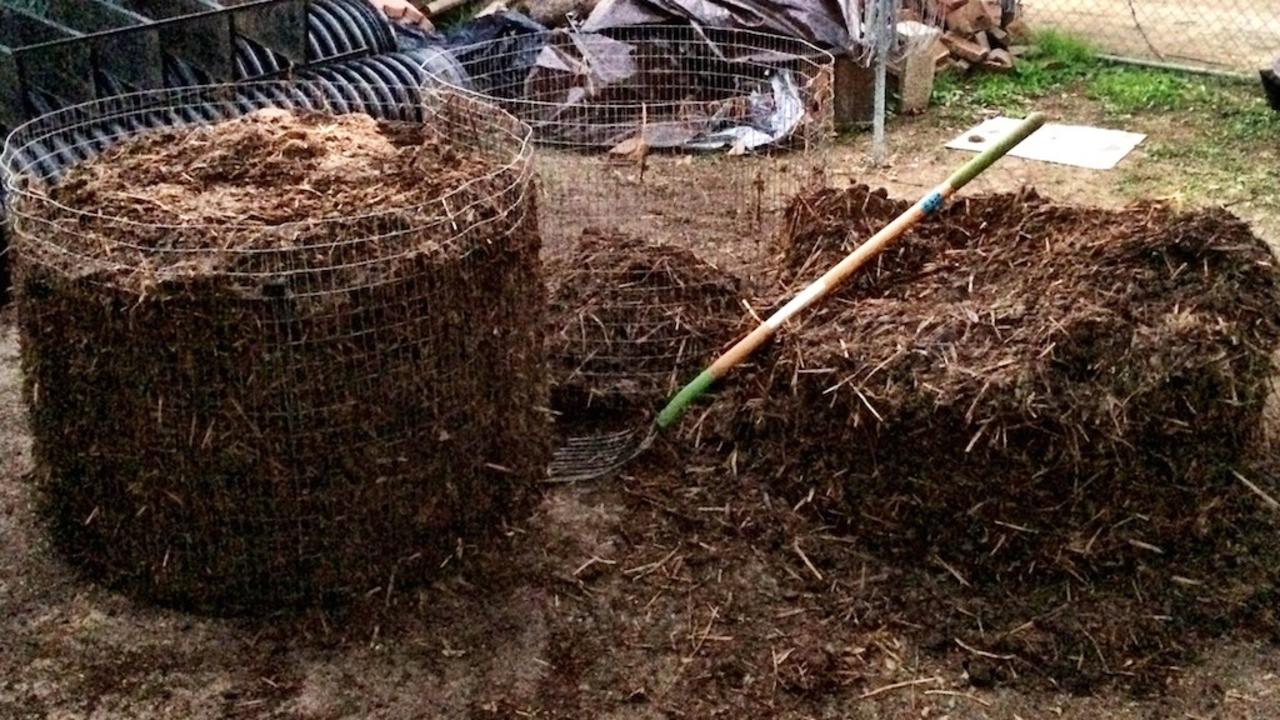
Roughly what you should expect to see after first building your compost pile.
Thermal composting takes good oversight. Ideal pile core temperatures should be between 131°F (55°C) and 155°F (68°C). Letting the pile exceed 165°F (74°C) will kill beneficial microbes, fungi and bacteria needed for biodiversity and pile completion. Turning a pile will drop the temperature by 15°F (9°C). Hotter temperatures will require more turns. A pile Temperature readings should be done a minimum of 2x a day. Keep a record of your core temperatures for reference.
- Gather all materials and store on site. A good volume ratio of materials to start with is 10% high N, 30% green, 60% woody. You can adjust it over time as you see what works. The more shredded your woody items, the more surface area is available and faster breakdown will occur.
- Cut your cage wire in half. Be careful with the sharp ends and its tendency to curl on you. Heavy objects or a friend are great to hold it down.
- Stand cage wire half up (use both if you have enough material) and fasten it shut with about 2-3" overlap. Use strawbale twine tied in a bow or quick-release knot. Using buckles is horrible as the pressure on the ring makes it neigh impossible to release!
- In your fertilizer hose end sprayer, mix your humic acid with water. Attach to your garden hose. You'll be moistening your pile (to the moisture consistency of a wrung out sponge) using this. The humic acid helps neutralize chloramines and chlorine that will kill beneficial bacterias and fungi. If you have rainwater as a source, use that without the humic acid as it shouldn't have chemicals in it if done right.
- Using your 5-gallon bucket, pack in your woody materials. Dump in 3 full buckets into the cage and spread out evenly. (You don't have to make a lasagna style, but it is fun and keeps you from forgetting what the next item is.)
- After thoroughly wetting the woody material, next add 1.5 buckets of green material, well compressed and spread on top of woody base layer. Repeat wetting process, but be sure you're not drowing it.
- Apply 0.5 of a bucket of high nitrogen material, spread across top of green materal. Compress all layers with a 'grape stomp' method or tamper to ensure good physical contact of the elements. Lightly wet this as well.
- Repeat Steps 5-7 until you reach the top of the cage wire.
- Spray a final mist around all sides of the pile. Note the starting internal temperature by plunging your compost thermometer in from the middle side and once from the top center. Average these two temps and write it down with the date and time. The goal is to measure the center.
- Cover your pile with the tarp to keep moisture and heat inside. Adjust this to suit your conditions.
- Check back on the pile temp every 12 hours (or more if it's at crucial temps) and document the times.

In the "red zone". This pile should be turned, um, now.
Turning the Compost Pile
If you want a pile ready in 21-days (good luck!) then you'll want to turn often and prime the pile using Activated Compost Tea (ACT). Most people are best to take a bit more time and aim for a ready pile in 6-8 weeks. The longer you cure, the greater the fungal development in the pile, at the cost of bacteria availability as it will drop off as food sources deplete. Since cellulose and lignin take longer to be consumed, the fungi have a chance to cure in the compost for 1-3 months after final turn. It all depends (doesn't it always) on what your end needs are. The goal is to invert the pile on each term. Not only top to bottom, but sides to inside and vice versa.
- Remove the tarp, clear out space to move the pile.
- Take the average temperature of the pile and document it.
- Unhinge/detach the ring and reassemble it in your cleared out space. Don't go far, you've got to fork the pile into this empty ring.
- Fork your pile in, always moving the cooler, external parts toward the center to achieve uniform decomposition. Compress the layers and moisten (if needed) with humic acid treated water.
- Repeat until your pile is rebuilt. Pick up all material that dropped and keep it in the pile.
- Rewet if need be, careful not to overwet, and seal with the tarp.
- Continue monitoring the temperature on a time frame that is appropriate for the piles current temperature range.
It's Ready, When?
Thankfully, since this isn't something to exact, you can use your compost when you feel like. The best time is when the internal temps have started to fall out of the active zone and has cured for about 1-4 weeks (or longer if you need more fungal dominated compost). Then, spread it around your plants, brew an Activated Compost Tea and use it as a soil drench or foliar spray, or use some to inoculate a new pile. If you have a microscope and have trained with Dr. Elaine Ingham or one of her students, like Loida Vasquez, you can take a peek at your creation and see just how biodiverse it is. Please, feel free to offer any insights, constructive critiques or info on your own style of compost creation. This method suits many as it's relatively quick, eradicates most weed seeds, and produces a homogenous compost that most plants love.
Happy Composting!
FREE REPORT - 8 Ways To Save Water In Your Landscape
Learn the techniques we use on a daily basis to maximize your water budget.