Effective Erosion Control: Straw Wattle
Straw wattles (aka fiber rolls) are fiber filled mesh tubes used to interrupt and slow water descending a slope through sheet flow and/or minor rill/gully formations.
Straw Wattles

Straw wattles help slow, spread and sink water in addition to capturing sediment and other runoff.
Used extensively in transportation and construction as best management practice (BMP), straw wattles are useful tools for effective runoff and sediment control. Coupled with erosion control techniques like mulching, jute mats, soil pitting or fish scale straw mulch, wattles help keep runoff and sediment for moving further downslope on a site.
Straw Wattles / Fiber Rolls

Cross section of proper wattle installation using five-stake method (for 25' wattles).

Our suggestion of overlapping wattle ends. You can also butt ends together, just monitor to ensure no water is channeling through the ends.
Resources abound covering various approaches towards wattle installation. Google "bmp straw wattle [YOUR STATE]" to begin exploring what's out there. But here are links to a few useful guides that have helped us in our training for using these:
Typical dimensions of wattles are 9" x 25'. Some styles are 12" in diameter and can be longer. The mesh tube or sock that holds the straw is usually sold with plastic netting, but we prefer jute, sisal or burlap nets due to their biodegradability.

Using a water level for finding level contour is essential to avoid concentrating water which could lead to more erosion.
Treatment Summary
Plastic or natural fiber mesh tubes of varying lengths filled with straw or fiber installed on contour for runoff and sediment control. When used as a diversion treatment to starve gully erosion, install at 1-2% grade away from the gully and spill at a spreading area or 2nd wattle section installed on contour Spacing of wattles or socks decreases as slopes increase in steepness.
Proper installation is crucial for wattles to work effectively, and when combined with mulch they improve moisture retention and reduce surface erosion which can lead to undercutting of the wattle.
Materials & Tools
- Wattles/Fiber rolls: 9-12” diameter tubes, 10-30’ long
- Wood stakes: 5 1x2 or 2x2 18-24” long per wattle, or #3/#4 rebar
- Hand Tools: shovels, pulaskis, 3-5lb hammer for stakes/rebar
- Flags and contour level tools (bunyip/water level, laser level)
- Seeds and mycorrhizae inoculant for plant establishment
Site Selection
Sloping eroded or bare soils, restoration project areas, recently disturbed construction sites, and revegetation work. Areas susceptible to runoff and sediment loss.

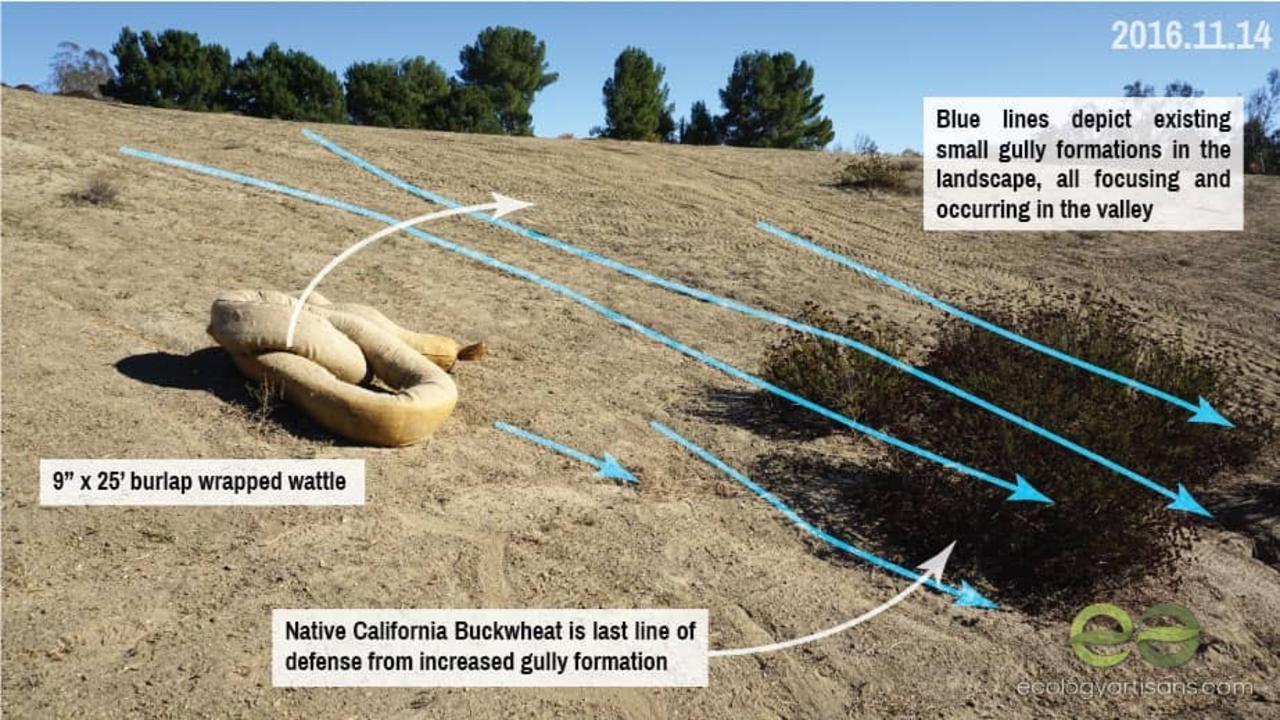
The site prior to any surveying or wattle installation. Note channeling and gully formation without treatment.
Indicators
- Eroded or bare soils
- Slopes
- Downhill gully or rill erosion
Installation

Marking slight off-contour line with a water level (bunyip) for straw wattle installation.
- Layout a contour line on the slope with a hand level and wire flags. Space install lines according to Table 1.
- If uphill from gully head cut, layout similar to worm ditch with slight fall (1-2%) away from gully to divert water to side-hill and maintain sheet flow.
- Dig a depression 5 inches deep (for 9” wattles, or 7” for 12” wattles) with spoils on uphill slope. Lay wattle, seam side down into it.
- Drive a 1x2 or 2x2 wooden stake (or #3 or #4 rebar, depending on soil hardness) through the center of the wattle 6” inboard of each end at least 6 inches into the ground, stopping about two inches above the wattle.
- Put 5 stakes in each wattle roughly 8’ apart
- For multiple wattles in 1 row, install with 1’ overlap (widen trench at overlap to keep wattles from sitting atop soil).
- Keep a smooth contour or grade at overlap and shingle to maintain flow of water along wattle towards ridge forms.
- Seat the wattle with foot tamped backfill on the upstream side such that water flowing down the slope will not run under it. Backfill any gaps in downhill side as well.
Table 1: Recommended Spacing for Straw Wattles
| Land Slope (%) | Spacing (ft) | # Wattles (ft/acre) |
| 10-20 | 60 | 726 |
| 20-50 | 30 | 1452 |
| > 50 | 10 | 4356 |

Tamping down wattle into footer trench (5" is a good depth for 9" wattles, 7" of 12" wattles).
Inspection & Quality Control
- Ensure trenches are not dug too shallow or too deep and are on contour or fall at the appropriate grade away from gullies.
- Verify that sufficient stakes are used and 1’ of overlap on wattles is achieved. Ensure contour is maintained as step overlap occurs. Aim for contour line overlaps to “step” from valleys toward ridges.
- Sufficiently foot tamp the upstream backfill on the wattles to prevent undercutting.
- Clean up and remove any unused material.
Maintenance & Follow Up
- Repair or replace split, torn, unraveling, dislodged or slumping wattles.
- Pay attention to any animal burrows that may be channeling water under wattles.
- Inspect wattles when rain is forecast, following rainfall events and once daily during prolonged rainfall. Perform maintenance as needed.
- Seed upstream/uphill sediment during rainy season to aid in establishment of vegetation
- Wattles are designed to be left in place. If wattles must be removed, remove all stakes and plastic debris and fill in trench or apply other treatment to control erosion.
- If water flows around wattle and creates rill or feeds gully erosion, fill and compact cuts, extend with additional wattle, rock mulch, etc with slight uphill grade.
Feedback from Implementation

Without effective erosion controls, we don't really see how storms carry soil away. This sediment would be lost further downslope without this wattle.
When installed correctly, straw wattles perform well, but far too often, improper installation leads to premature failure. This is usually due to skimping on proper trenching and securing of the wattle, or not accounting for the volume of water impacting the wattle. At the Meadowview Training Day with the NCCC, finding the contour line for the wattle was easy using a water level (bunyip). We wanted to experiment with encouraging any overland flow to be shifted from the valley center towards the traditionally drier ridges. This was accomplished by adjusting our outer flags at a rate of 1/4" per 1', or 2% slope. Digging the 5" footer (for 9" wattles) was a challenge given the dry, compacted conditions of the site soil. We also only dug a 3-4" footer that we later agreed would be better served by extending it 1-2" deeper. The bottom of this footer also acts as a mini swale capturing and helping infiltrate water back into the soil. As for the stakes, knowing that our grounds were at the tail end of the dry season, we opted for #3 rebar. #4 (1/2") rebar would have been slightly easier to use due to the increased thickness. Another attempt at experimenting with securing the wattles was pre-bending a small "L" into one end so that it would crimp and pin the wattle better, alleviating the need for the orange rebar cap. But, given the thin #3 rebar we used and the awkward curved striking surface, we had horrible results, and advise to use 16-18" #4 rebar or 18" wooden stakes for future projects. Caltrans and other crews use a zig-zag wire tie method for securing the wattles in place. This is more effective, but also requires more hands to accomplish it and takes more time and materials, but does offer more peace and mind. For lower risk areas, the standard five-stake installation is sufficient if all other steps are followed correctly. Where installed appropriately, the straw wattles have worked wonderfully. Sediment accumulation on the upslope of the wattle is happening as well as seed recruitment and moisture retention. Gullying is reduced or eliminated downslope of the wattles in its entirety.

With effective native plant seeding, plants should be able to colonize the biodegradable wattle and reduce further erosion over time.

Gullying is all but eliminated in this section of the slope. They also benefited from a 1" compost layer.

In some areas, the sediment capture is quite impressive.
Where wattles are improperly installed, we see the same erosion and runoff conditions occurring that were present prior to the wattle installation. A couple of reasons for this failure are:
- Improper trenching of a footer for the wattle. Volunteers not supervised by Ecology Artisans installed wattles over a gully by simply placing the wattle on the surface of the soil. Water totally ignores the wattle and continues its erosive path down the hill.
- Improper leveling of the straw wattle. This can be less of an issue if the slope of the wattles is taking water from a zone of water abundance to a zone of water scarcity, like a valley to a ridge. However, directing additional water to a valley or area of concentration increases volume, speed and the erosive capabilities of that flow. Water in these conditions spills over the wattle, chews away at the unarmored soil downslope which then starts a migrating head cut that undermines the wattle and eventually creates a new gully.

Poor installation of this wattle allowed water to bypass it and continue eroding soils and polluting our storm drains.

An example of improper leveling. Water concentrated in one area of the wattle until it overflowed it, undermining the soil downslope and carrying sediment to our streams, rivers and ocean.
Conclusion
When used appropriately and in the correct context, straw wattles (fiber rolls) are excellent and fast runoff and sediment control tools. They can look a bit ugly in a landscape, but when natural fiber meshes are used, they quickly return to the soil (3-5 years depending on rainfall and site conditions). Combined with seeding and inoculant for boosting soil biological diversity, plants benefit from the sediment and moisture capture that these wattles provide. Explore more straw wattles and fiber roll install photos on our Flickr album.
FREE REPORT - 8 Ways To Save Water In Your Landscape
Learn the techniques we use on a daily basis to maximize your water budget.